Monday, June 11, 2018

How can I remove a URL on my website from the Google Index?

To remove a specific URL (for example, the page http://www.example.com/page4.html) of your own website from Google’s index, there are two options available:

Option #1: Use the robots meta-element with NOINDEX

Add the meta-element robots to the source code of the page which is not supposed to appear in the index and set the value to NOINDEX.
By adding the following to the source code of a page, it will be removed from the index:
<meta name="robots" content="noindex">
You have to add the meta-element in the <head> area of the specific page:
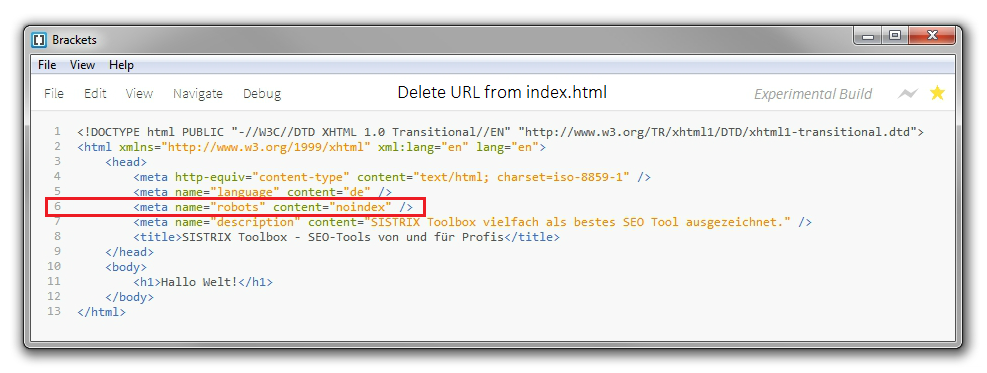
line 6: robots meta element with the value NOINDEX in the source code
If the page already has the robots meta-element with the value INDEX, you can simply replace it with NOINDEX.
Done. Now you just have to wait until the desired URL is removed from the Google index.
By using the meta-robots value NOINDEX, the URL will also be removed from the index of Microsoft’s search engine Bing.

Option #2: Use the Google Search Console

Using a setting within the Google Search Console, you are able to easily have a URL removed from the Google index.
In case you are not yet using the Google Search Console, you can activate your website for the free (www.google.com/webmasters/tools/?hl=en) in just a few minutes. This also lets you remove URLs from the Google Index afterwards.
Removing a URL from the index with the Google Search Console:
  • Log into the Google Search Console and select the desired website
  • Click on “Optimization” in the left-hand navigation
  • Click on “Remove URL” in the sub-menu
  • Click on the button “create a new request for removal” on this page
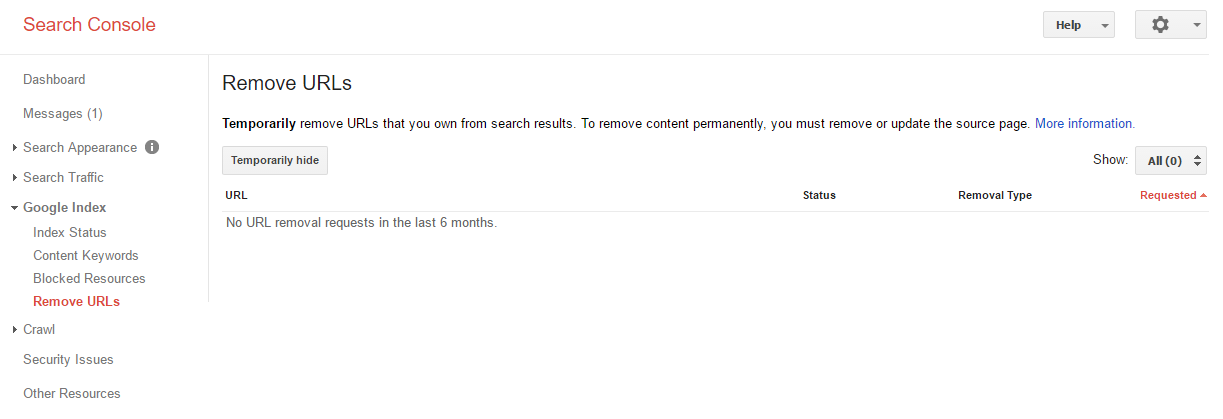
Option to remove a URL from the Search Console
  • You will now be asked to type in the URL of the page that you want to be removed and confirm your choice by clicking on “continue” (in our example this is the page http://www.example.com/page4.html)
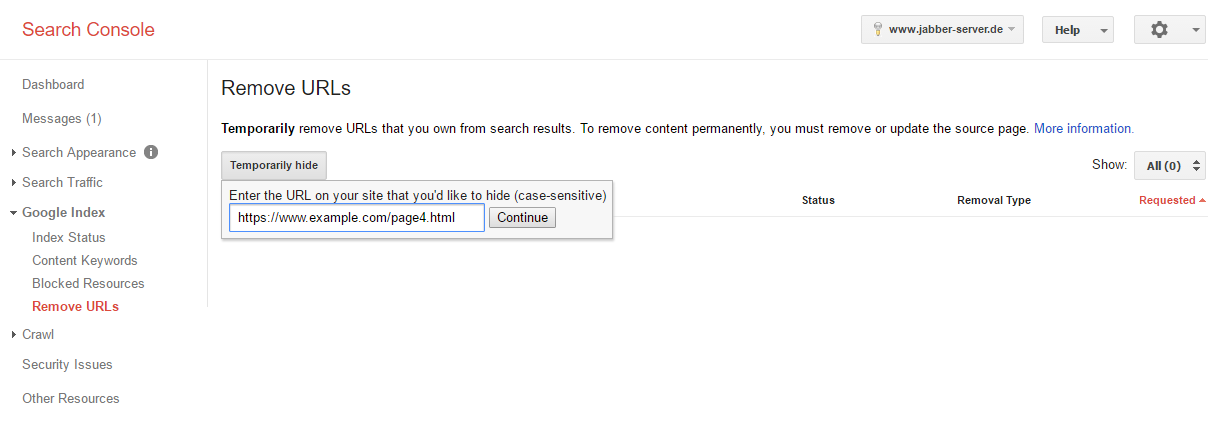
Option to remove a URL in the Search Console: Entering of a URL
Done. Now you have to wait some time until the desired URL is removed from Google’s index.
The Google Search Console will now also indicate the status of the removal process of the URL on this page.
The search engine Bing also provides their own webmaster tools, which you can use to have URLs removed from their index.
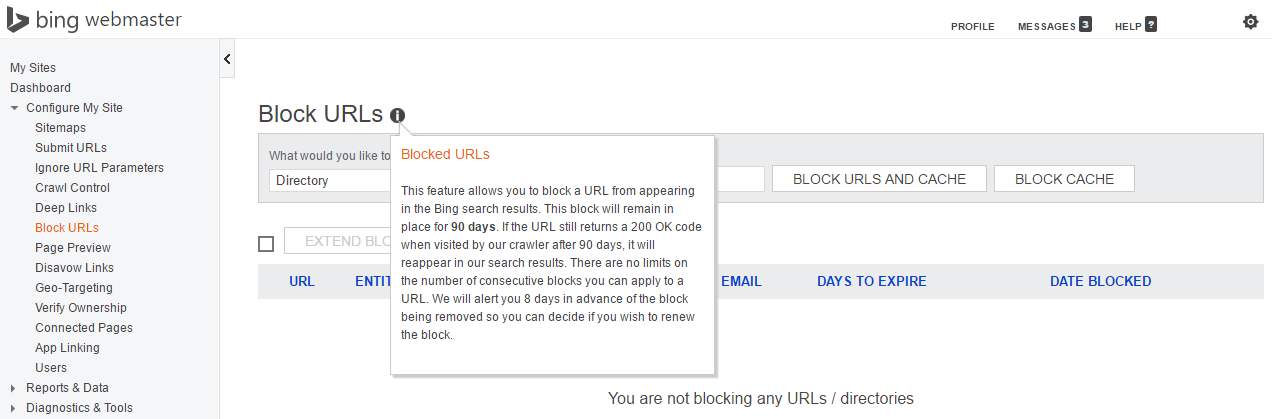
Bing webmaster tools option of blocking a URL from being indexed
(http://www.bing.com/toolbox/webmaster)

Tip

If you use option #2 to remove a URL from the index, by using the Google Search Console / Bing Webmaster-Tools, the deletion may only be temporary in some cases.
The URL will definitely be removed from the search index for 90 days. Afterwards, there is a possibility that the URL may be re-introduced into the index, if the URL is still accessible and links still point to it.
If you want to make sure that a URL is permanently removed from the index, you should go with option #1 and use the robots meta-element with NOINDEX.

Wednesday, June 6, 2018

How to Remove Japanese SEO Spam from your Website ?

Discovering the Hack

1. Identify infected pages using Google Search

You can uncover such pages by opening Google Search and searching for:
site:[your site root URL] japan
Navigate through some pages of the search results to see if you discover any suspicious looking URLs. These are the pages indexed by Google containing the word ‘japan’. If you notice pages with the Japanese characters in the title or description, it is likely that your website is infected.
Japanese SEO Spam in Google Search Results

2. Verify with Security Issues Tool in Google Search Console

In your Google Search Console (earlier called Google Webmaster Tools), navigate to the Security Issues Tool in the left sidebar.
Google Search Console Security Issues Tool

3. Fetch as Google to check for ‘Cloaking’

When you visit any of these hacked pages, you might see a 404 not found page suggesting that the web page doesn’t exist. Be careful, the hacker may be using a technique called cloaking. Check for clocking by using the “Fetch as Google” tool in your Google Search Console.

Fixing the Japanese SEO Spam Hack

1. Remove any newly created user accounts in the Search Console

If you don’t recognize any users in the “Users and Property Owners” tab, immediately their revoke access. Websites hacked with the Japanese SEO Spam add spammy Gmail accounts as admins so that they can change your site’s settings like sitemaps and geotargeting.

2. Run a Malware Scan

Scan your web server for malware and malicious files using the ‘Virus Scanner’ tool in the cPanel provided by your web host.

3. Check your .htaccess file

Hackers often use the .htaccess file to redirect users and search engines to different malicious pages. Verify the contents of the .htaccess file from a last known clean version of the file from your backups. If you find any suspicious code, comment it out by putting the ‘#’ character in front of the rule.

4. Check Recently Modified Files

Login to your web server via SSH and execute the following command to find the most recently modified files:
find /path-of-www -type f -printf '%TY-%Tm-%Td %TT %p\n' | sort -r
If you are an Astra customer, you would have received an email telling you about malicious file changes.

5. Check your Sitemap

A hacker may modified, or added a new sitemap to get the Japanese SEO Spam pages indexed quickly. If you notice any suspicious links in the sitemap, ensure that you quickly update your CMS core files from a last known clean backup.

 6. Prevent future attacks with a Website Firewall

Another option to prevent the Japanese SEO Spam infections is to use a Website Firwall.


If you are still looking for an expert then feel free to reach out to us at support@ingressit.com and someone from our team will surely help you. 


Friday, December 13, 2013

Oracle 12c New Feature - Temporary Undo

As we all know Oracle database always contains a set of system related tablespaces such as SYSTEM, SYSAUX, UNDO & TEMP, and each of them are used for different purposes within the Oracle database. Pre Oracle 12c R1, undo records generated by the temporary tables used to be stored in undo tablespace, much similar to a general/persistent table undo records. However, with the new feature introduced in 12c R1 temporary undo, the temporary undo records can now be stored in a temporary table instead of stored in undo tablespace. 

Benefit of temporary undo 

Reduction in undo tablespace and less redo data generation as all this information won’t be logged in redo logs. Also this feature is flexible and DBA can enable the temporary undo option either at session level or database level.

Enabling temporary undo

To enable this new feature, the following needs to be set:

Compatibility parameter must be set to 12.0.0 or higher
Initialization parameter TEMP_UNDO_ENABLED needs to be enabled
As described above all the temporary undo records are now stored in a temp tablespace, we need to create the temporary tablespace with sufficient space
For session level, we can use: ALTER SESSION SET TEMP_UNDO_ENABLE=TRUE;

Important V$ Views

The dictionary views listed below are used to view/query the information/statistics about the temporary undo data:

V$TEMPUNDOSTAT
DBA_HIST_UNDOSTAT
V$UNDOSTAT

If we would like to disable this feature, we need to execute the below statement:

SQL> ALTER SYSTEM|SESSION SET TEMP_UNDO_ENABLED=FALSE;

Oracle 12c New Features

Oracle announced and looked back into the ten key focus areas and incorporated new functionality and features in each of them.

1) The infrastructure or framework behind Cloud Control
2) Cloud Control Management
3) Capacity Planning
4) Exadata/Exalogic Management
5) Configuration Management
6) Provisioning/Patching, Application Management
7) Database Management
8) Fusion Middleware Management
9) Middleware Management
10) Application Quality Management

More details will be shared soon. 

Tuesday, December 11, 2012

Step by Step guide to install SQL Server 2008 R2


A Step by Step guide to install SQL Server 2008 R2


Developers and system administrators will find this installation guide useful, as well as DBAs. It will teach you the basics required for a typical, problem-free installation of SQL Server 2008 R2, allowing you to add other components later if you wish. 


Step 1: Setup.exe


Step 2: SQL Server Installation Center
Click on the Installation hyperlink on the left hand side of the screen: 


Step 3: SQL Server Installation Center
Click on the "New installation or add features to an existing installation." link on the right side of the screen:
A command prompt window will flash and Setup Rules dialog box will show up.


Step 4: Pre-requisites check


You need to make sure that all Setup Rules are passed. If there are failed rules, you won’t be able to proceed.
In case of warnings, you can continue to install, but you still should note the warning and take corrective measures, before or after installation.
Click on the OK button.


Step 5: Product key
The Product Key page is used to authenticate your license of SQL Server or choose to install a free edition – Evaluation Enterprise Edition, Express Edition, or Express Edition with Advanced Services. Copies downloaded from MSDN often have the product key supplied automatically. 
Click on the Next button.


Step 6: License Terms
Go through the License Terms and if you are agrees upon the terms, then check on “I accept the license terms”. 


Click on the Next button.
Step 7: Setup Support Files


Click on the Next button.


Step 8: Setup Support Rules


You need to make sure that all Setup Rules are passed. If there are failed rules, you won’t be able to proceed. In case of warnings, you can continue to install, but you still should note the warning and take corrective measures, before or after installation.
As you will see here there has been Warning upon the Windows Firewall, so it’s a default warning and you need not had to worry about it. Just check that it should be using the Port No. 1433. Click on the “Warning” link. So a dialog box will appear. 


Click on the Next button.


Step 9: Setup Role
Here we have three kinds of Setup roles available for the installation.


SQL Server Feature Installation’ is the installation option which individually selects which feature component to install, or click a feature role to install a specific configuration.
SQL Server PowerPivot for SharePoint’  gives users the ability to analyze massive quantities of data, and its seamless integration with Microsoft SharePoint Server 2010 helps IT departments monitor and manage how users collaborate.
‘All Features with Defaults’ install all the features using the default values for the service accounts.
We have selected here SQL Server Feature Installation and then Click on Next.


Step 10: Feature Selection
So under the Feature Selection, it’s on you what the feature you want to work with. You have the option to either Select All or multiple options can be selected. If you want to feature all of these features, then click on Select All.


Once the option are selected click Next button to proceed further.


Step 11: Installation Rules 


Installation Rules are the predefined rule which is being used to check if the Operation are being completed, or blocked. So if there has been any Operation which is being “Failed” or “Warning”, certain actions should be taken around before preceding it further.
Click on the Next button.


Step 12: Instance Configuration
Instance Configuration is the crucial part of your installation where you need to choose among the two: Default Instance or Named Instance.


Default Instance is the one under which there an Instance name which is being defined and cannot be changed, and you can have only one Default Instance. But the advantage of having Named instance is that you can name them, so it’s easier for you to identify each one of them uniquely. So we have chosen here Named Instance and specified a name SQLSERVER2KR2.
Click on the Next button


Step 13: Disk Space Requirements
Your system should surpass the requirements of space required by the installation process.


Click on Next button.


Step 14: Server Configuration
Sever Configuration page shows up the service accounts and collation configuration. Click on Use the same account for all SQL Server services.


This page supplies server options for the Database Engine component. Here is where the Windows service account is configured so that SQL Server will have permission to execute and access to files.
Also configured in this page is the initial startup type, which determines whether the services start automatically when Windows starts or whether they require manual starting.
Click on the Use the same account for all SQL Server Services to provide the username and password as given in the below screenshot.


Here I don’t have Active Directory setup so I am using the local admin account but if you have any AD Account please use the same.
After inserting the Account Name and Password, Click on Ok and all the empty username and password filled with the provided username.
A common error on this page is to miss the Collation tab on this page. The default is probably OK for most installations, but be careful that you don’t miss this important step.
Click on Next button.


Step 15: Database Engine Configuration
Click on Account Provisioning tab


Here in the Database Engine Configuration, you have to select the authentication mode out of the two: Windows Authentication & Mode and Mixed Mode.
Windows Authentication Mode enables Windows Authentication and disables SQL Server Authentication.
Mixed Mode enables both Windows Authentication and SQL Server Authentication. SQL Server Authentication becomes very important part when it comes to security, so there should be credentials (login and password) every time that they connect. 
After you enter the password, Click on “Add current user” as shown in the below screenshot.


Click on Data Directories tab


Ideally the User data and the log files directory should be kept separately from each other which enhance the performance. The same is also is in the case of Temp DB data and log files directory. The Backup directory is also being kept separate from rest of these will either be in Tape drive or other disks.
The Filestream tab is where Filestream is enabled for the server.
Click on Next button

Step 16: Analysis Services Configuration
The Analysis Services Configuration page is being used to add initial users with administrative permission and configure the default directories for Analysis Services.


Click on the Account Provisioning tab and then click on the Add Current User button.
Click on Data Directories tab. As we said earlier Data and Log files directory must be a separate one, so it should be follow it again.
Click on Next button.


Step 17: Reporting Services Configuration
The Reporting Services Configuration Page is being used to select the native configuration or SharePoint configuration.
You should choose ‘Install the native mode default configuration’.


Click on Next button.


Step 18: Error Reporting
The Microsoft SQL Server team really does use this information to collect usage statistics on SQL Server features and error reports. This information is key to determining where the team’s efforts should be invested.
Here check on the “Send Windows and SQL Server …”and then click on Next.


Step 19: Installation Configuration Rules
This rendition of the Rules page verifies the installation Configuration.
Click on Next button.


Step 20: Ready to Install
The Ready to install page reports the complete configuration in a tree view, and the location of the created .ini file with these configuration options.


Click on Install button.


Step 21: Completion Page
The installation for the SQL Server 2008 R2 has been completed. There might be some warnings, let see.


If you will get this warning, then carefully perform for each and every warning:

  • Setup has detected a non-canonical discretionary access control list (DACL) on directory 'C:\Program Files (x86)\Microsoft SQL Server\90\Shared\'. Please verify your security settings and make corrections if needed.
Select the folder 'C: \Program Files (x86)\Microsoft SQL Server\90\Shared\'   -> Right-Click -> Properties -> Security Tab -> Edit. Then the error will show up that the permissions are not proper; do you want to order them? Click Reorder and add permissions.
  • Setup has detected a non-canonical discretionary access control list (DACL) on directory 'C:\Program Files\Microsoft SQL Server\MSAS10_50.SQLSERVER2K8R2\OLAP\bin\'.Please verify your security settings and make corrections if needed.
Select the folder 'C:\Program Files\Microsoft SQL Server\MSAS10_50.SQLSERVER2K8R2\OLAP\bin\'  ->  Right-Click  -> Properties  ->  Security Tab  ->  Edit. Then the error will show up that the permissions are not proper; do you want to order them? Click Reorder and add permissions.
  • Setup has detected a non canonical discretionary access control list (DACL) on directory 'C:\Program Files\Microsoft SQL Server\MSAS10_50.SQLSERVER2K8R2\OLAP'. Please verify your security settings and make corrections if needed.
Select the folder 'C:\Program Files\Microsoft SQL Server\MSAS10_50.SQLSERVER2K8R2\OLAP'  ->  Right-Click  -> Properties  ->  Security Tab  ->  Edit. Then the error will show up that the permissions are not proper; do you want to order them? Click Reorder and add permissions.


iMerge Group Blogspot will now be known as Ingress IT Solutions Blog

Hello Friends,

iMerge Group Blogspot will now be known as Ingress IT Solutions Blog. All post, information and examples will be managed by Ingress Team.

You can visit ingressit.com website for more information.

Ingress Team will manage post related to Oracle, MS-SQL Server, MySQL, PostgreSQL, Sybase Database and other technical information that will help you in your professional career with real-time scenarios.

Thanks,
iMERGE Group Team.

Tuesday, April 24, 2012

Resolved: PRCR-1079 ORA-00119 CRS-2674 CRS-2528 Oracle 11g Release 2 Cannot Start Database

Issue: Cannot start the database with SRVCTL start database -d testdb

srvctl start database -d testdb


PRCR-1079 : Failed to start resource ora.testdb.db
ORA-00119: invalid specification for system parameter %s
CRS-2674: Start of 'ora.testdb.db' on 'linux-rac01' failed
CRS-2528: Unable to place an instance of 'ora.testdb.db' as all possible servers are occupied by the resource already
ORA-00119: invalid specification for system parameter %s
CRS-2674: Start of 'ora.testdb.db' on 'linux-rac02' failed

To troubleshoot further if you try to open the database from SQLPLUS with any of the instances you will receive below error message.

SQL> startup


ORA-00119: invalid specification for system parameter REMOTE_LISTENER
ORA-00132: syntax error or unresolved network name 'linux-rac-scan:1521'


There is a remote.listener parameter in spfile/pfile. If you are using SPFILE then try to create a pfile using spfile with below command.

SQL> create pfile='/tmp/ptestdb.ora' from spfile='+Data/testdb/pfiletestdb.ora'

Open the pfile you will find a parameter *.remote.listener which will be something like this:

*.remote_listener='linux-rac-scan:1521'


The error here is because when I checked srvctl config scan I found that scan name is a fully qualified name linux-rac-scan.ingress.com where as here it is initial. So we need to modify this parameter and should change it to:

*.remote_listener='linux-rac-scan.ingress.com:1521'


Once the modification is done try to open the database on any of the instance using that particular pfile.

SQL>startup pfile='/tmp/ptestdb.ora'
Database will be opened without any errors. Once this modification is done try to re-create spfile using this pfile by below command.

SQL> create spfile='+Data/testdb/pfiletestdb.ora' from pfile='/tmp/ptestdb.ora'


Once the Spfile is created shutdown database and try to start the database using srvctl command.

srvctl start database -d testdb -o open

You will see that command will get successfully completed and your database will be up and running.

Hope this article will help you in your issue. If you have any trouble please feel free to drop a comments.

How can I remove a URL on my website from the Google Index?

To remove a specific URL (for example, the page http://www.example.com/page4.html) of your own website from Google’s index, there are two ...